What the Roblox pants template is
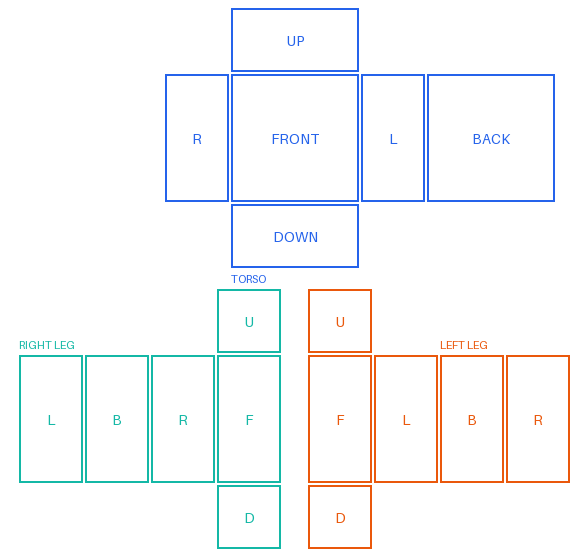
A classic pair of Roblox pants is one image drawn on a 585 × 559 canvas, exactly like a shirt. The torso gets the middle block of the image, and the two columns below it become the legs. Roblox cuts the image into flat panels and wraps each panel onto the matching part of the avatar, so whatever you paint inside a panel is what people see on that leg or on that side of the waist.
Because the canvas is shared, anything you already know about the shirt template layout carries over: same file size, same torso block, same rule that the avatar's right leg is on the left half of the image.
Pants template vs shirt template
The only difference is what sits under the torso block. On the shirt template those two columns are arms: four 64 × 128 sides each plus a 64 × 64 end for the hand. On the pants template the same space is legs: four 64 × 128 sides each plus a 64 × 64 end for the shoe area. If you swap the two files by mistake, Roblox still accepts the upload and your design ends up on the wrong body part, which is one of the most common reasons a first outfit looks broken in game.
A classic T-shirt is a different item again: a single square image that only shows on the front of the torso. It has no back, no sleeves and no legs.
Panel sizes on the pants template
| Part | Size in pixels | Panels |
|---|---|---|
| Torso front and back | 128 × 128 | FRONT, BACK |
| Torso sides | 64 × 128 | R, L |
| Torso top and bottom | 128 × 64 | UP, DOWN |
| Leg sides | 64 × 128 | L, B, R, F |
| Leg ends | 64 × 64 | U, D |
How to make pants in the browser
- Open the maker from the button above and switch the toggle from Shirt to Pants. The preview then shows the legs under the shirt you already have.
- Fill the base color. Pick a color and press Fill every part with the color, or fill single panels if the waist should differ from the legs.
- Draw the details. Use the brush and eraser, and watch the label under the canvas, which names the panel under your pointer with its pixel position.
- Drop an image. Choose a panel such as Right leg – Front and pick a file; it is cropped to fill exactly that panel, so a logo lands on the thigh without measuring anything.
- Check both sides. The preview switches between front and back. Look for a pattern that stops dead at the seam between the front and side panels.
- Download the PNG. The file is 585 × 559 with a transparent background, and the guide lines are not included.
Already have a design? Use Open a 585×559 image to load it, then fix it panel by panel.
Two things that go wrong with pants
- The waist line. Pants and shirt overlap at the torso, and the shirt wins. If you want a belt to show, leave the bottom rows of the shirt torso transparent, or draw the belt lower on the pants.
- The cuff. The shoe area is the 64 × 64 end panel, not the bottom of the leg sides. A cuff drawn at the bottom of a side panel sits above the ankle.
Uploading pants to Roblox
Save the PNG, test it for free in Roblox Studio on a Block Avatar rig, then upload it from the Creator Dashboard under Avatar Items → Classics, with Asset Type set to Pants. Roblox's Creator Docs list an upload fee of 80 Robux per submission and creator requirements before you can sell. The step-by-step walkthrough is in how to upload a Roblox shirt template — the flow is identical for pants, and how to make a Roblox shirt covers the design side.
Sources
Sizes and the upload flow follow Roblox's own Creator Docs on classic clothing and the upload section. Fees can change, so check the fee there before you pay.