What actually works on a phone
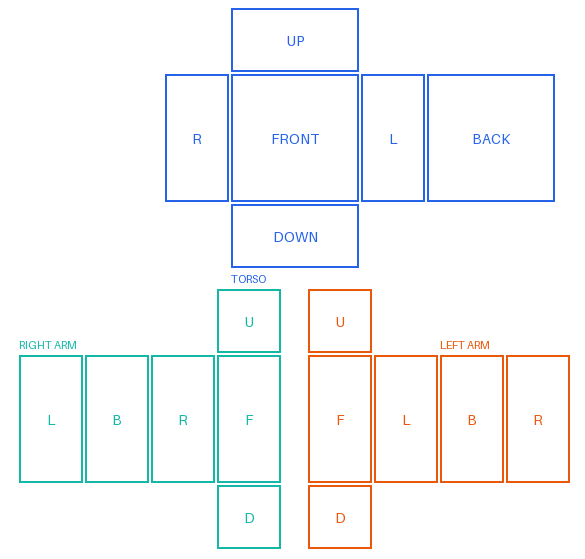
Everything up to the upload runs in the phone browser: the 585 × 559 canvas, the brush, the fill tool, dropping a photo from your camera roll and the PNG export. On iPhone that is Safari (or Chrome), on Android it is Chrome — no app store, no install.
The upload is the one part that happens on Roblox's own site, in a browser tab. You can do it on the phone, but the Creator Dashboard is built for a desktop screen, so many people design on the phone and finish the upload on a laptop.
Step 1: open the template
Open the maker on the phone and leave the toggle on Shirt for a shirt (Pants for trousers). Turn the phone sideways: the canvas gets more room and the preview sits next to it instead of below it.
Step 2: draw with a finger
- Press Fill part to pour a colour into one panel instead of painting it by hand — a finger is thick, and a fill gives clean edges on the 128 × 128 torso panels.
- Keep the brush Size slider low (2–4) for the waist line, the neckline and anything within a few pixels of a panel edge.
- Watch the label under the canvas: it names the panel under your finger and shows its pixel position, which is the only way to tell the front torso from a side panel on a small screen.
- The Undo button is your friend; fingers tap the wrong panel constantly.
Step 3: use a photo from your camera roll
Press Choose image, pick a panel such as Torso – Front, then pick a photo from your library. The photo is cropped to fill exactly that panel, so a logo lands on the chest without any measuring. A photo that is only a few hundred pixels wide will look soft once Roblox squeezes it into a 128-pixel panel, so pick a large one.
Step 4: get the PNG off the phone
Press Download PNG (585×559). On iPhone the file goes to the Downloads folder in Files; on Android it lands in Downloads. Keep it at 585 × 559 — some phone photo editors quietly resize on save, which is why exporting from the browser is safer than fixing the file afterwards in Photos.
Step 5: upload from the Creator Dashboard
Open create.roblox.com/dashboard/creations in the phone browser, choose Avatar Items → Classics, set Asset Type to Shirt or Pants, and pick the PNG from Downloads. Roblox's Creator Docs list a fee of 80 Robux per classic clothing submission (checked November 2026), and every upload goes through moderation. The full screen-by-screen walkthrough is in how to upload a Roblox shirt template.
If the dashboard is unusable on your phone, send yourself the PNG (AirDrop, email, Drive) and do just this step on a computer. The design does not depend on the device.
If you would rather draw in an app
Apps like ibisPaint on iOS and Pixlr on Android are fine for the drawing part — they have layers, real brushes and a proper eraser. The catch is the size: create a 585 × 559 canvas, import the blank template as a layer from the home page downloads, draw above it, hide the outline layer, then export as PNG with transparency. That extra step is the only reason to bother with an app; for a flat shirt with a logo, the browser maker finishes in a few minutes.
What to check before you spend Robux
- The design exists on the back as well as the front, or the avatar looks half-dressed when it turns.
- Nothing important runs across the seam between the front torso panel and a side panel.
- Sleeves are either fully painted or fully transparent — a half-painted sleeve reads as a printing error in game.
- Test the PNG in Roblox Studio on a Block Avatar rig first if you have a computer handy; that test is free.
Sources
Sizes and the upload flow follow Roblox's Creator Docs on classic clothing and uploading classic clothing.