What you need before you start
Nothing but a browser and your own artwork. No Photoshop, no Roblox Studio, no account on this site. You need a Roblox account only at the last step, when the finished PNG goes to the Creator Dashboard.
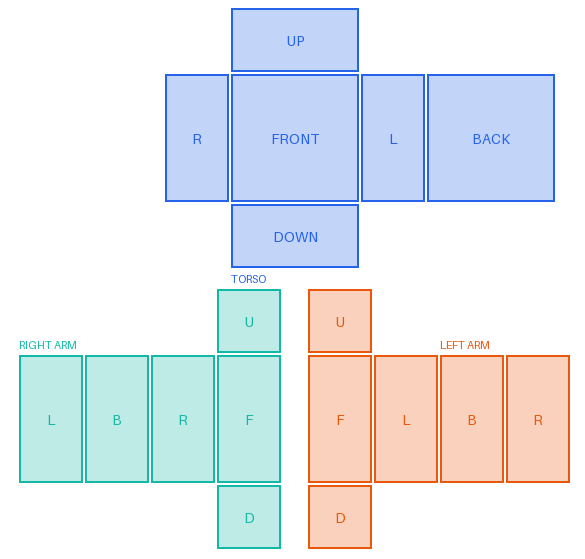
A classic shirt is one image on the 585 × 559 canvas, so the design work is deciding what goes on each panel: torso front, torso back, both side panels, then each arm.
Step 1: start from the 585 × 559 template
Open the maker, or take the blank PNG from the home page downloads if you would rather work in Photopea, GIMP, Photoshop or ibisPaint. Keep the file at exactly 585 × 559: scaling a shirt up or down blurs it, and Roblox expects the classic size.
Step 2: fill the base colour
Pick a colour and press Fill every part with the colour. This gives you a flat shirt you can already see on the preview. Fill single panels with Fill part if the sleeves should differ from the torso.
Step 3: put your design on the right panel
Two ways, both in the browser:
- Draw it. Brush, eraser and colour picker, with the panel name and pixel position shown under the canvas as you hover.
- Drop an image. Choose a panel, pick a file, and it is cropped to fill that panel exactly. A logo on the chest means choosing Torso – Front and nothing else.
Remember that the avatar's right arm is on the left half of the canvas.
Step 4: check front and back
Switch the preview between Front and Back. Two mistakes account for most first shirts: artwork that runs across the seam between the front panel and a side panel (it breaks in game), and a design that only exists on the front, so the back looks empty when the avatar turns around.
Step 5: export the PNG
Press Download PNG (585×559). The file has a transparent background, no watermark and no export limit, and the guide outlines are not baked in. Transparent areas become the parts where the avatar shows through — that is how you get sleeves, cutouts or a vest look.
Step 6: test it, then upload
Open Roblox Studio, drop a Block Avatar rig, add a Shirt in its properties and paste the image as a temporary asset. That test is free and saves you the upload fee on a bad file. When it looks right, upload it from the Creator Dashboard: Avatar Items → Classics, Asset Type Shirt, with a name and description that match the design. Roblox's Creator Docs list a fee of 80 Robux per classic clothing submission (checked November 2026) and review every upload.
The full walkthrough of that last part, with what each Creator Dashboard screen asks for, is in how to upload a Roblox shirt template.
Shirt or T-shirt?
A classic Shirt covers the torso and both arms, and it can wrap all the way round. A T-shirt is a single square image on the front of the torso only — the classic T-shirt canvas in Roblox's docs is a square, and it has no sleeves and no back. If you want sleeves, a back print or a hoodie look, you want the 585 × 559 shirt, not a T-shirt.
Pants use the same canvas with legs in place of arms; that is on the Roblox pants template page.
Sources
Sizes, file rules and the upload flow follow Roblox's Creator Docs on classic clothing, including creating and uploading classic clothing. Check the current fee and creator requirements there before you upload to sell.